A very common need for PowerPoint graphic design has been recognized by you! The secret to making well-designed, layered slides that look like cut-and-paste work is to make the backgrounds transparent. If you’re looking for expert-level design and professionally layered slides, our team at creativeone.cloud is ready to help.
It’s critical to understand the difference between making the background of an image transparent and making the background of a slide transparent. Instead of making the entire slide transparent, the former typically entails setting a transparent background image. To make portions of an image blend into the slide, most people want to make them transparent.
Let’s examine how to use PowerPoint to achieve that transparent magic.
How to Make the Background Transparent in PowerPoint: Beyond the Solid Box!
Have you ever attempted to add a logo, an icon, or even a person from a picture to your PowerPoint slide only to have a cumbersome white (or black, or whatever!) box appear around it? Your presentation may appear less polished and more like a hastily assembled collage due to that solid background.
Often, the secret to a polished, expert design is transparency, or letting your current slide background show through. PowerPoint has some surprisingly powerful tools for making backgrounds transparent or barely noticeable, despite not being a full-featured photo editor.
Now let’s explore the most typical situations and how to accomplish that transparent effect!
Scenario 1: Picture Background Transparency (The Most Common Need)
When most people inquire about transparent backgrounds in PowerPoint, they mean this. You want to eliminate the image’s background so that the primary subject is the only thing left.
Depending on your image, there are two primary approaches to this:
Method A: “Set Transparent Color” (suitable for backgrounds with simple, solid colors)
This method is a dream for images with a single, uniform background color, like a logo on a white square or a piece of clip art with a solid-colored backdrop.
Select Your Picture:Click the image you want to edit on your slide. This will cause the “Picture Format” tab (also called “Picture Tools Format”) to appear in the top ribbon.
Select “Color” from the menu:Locate the “Color” button on the “Picture Format” tab. A drop-down menu will show up when you click it.
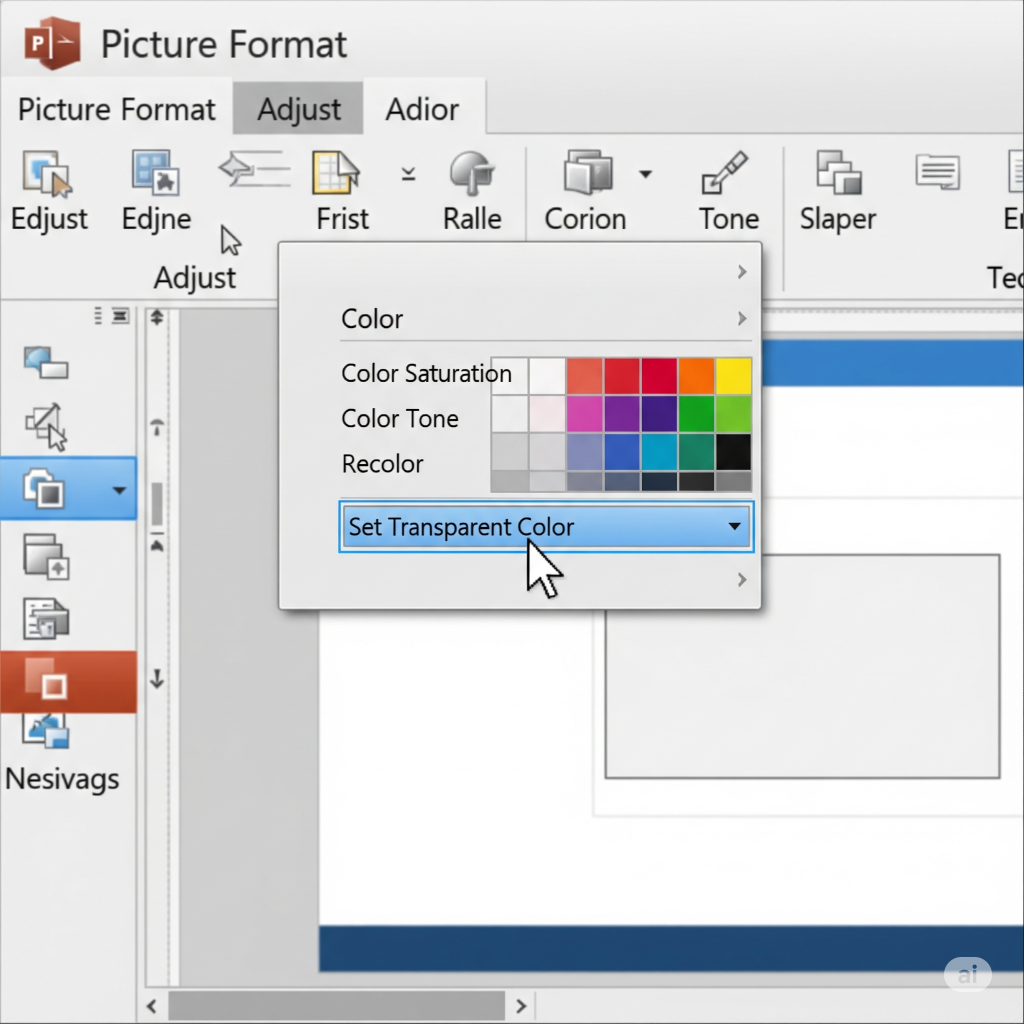
Choose “Set Transparent Color”: Near the bottom of the “Color” dropdown menu is the “Set Transparent Color” option. Select this option.
Click the Color to Vanish: Your mouse cursor will change into a special icon (often like a pen with a small arrow). Carefully click directly on the specific color in your image that you want to make transparent.
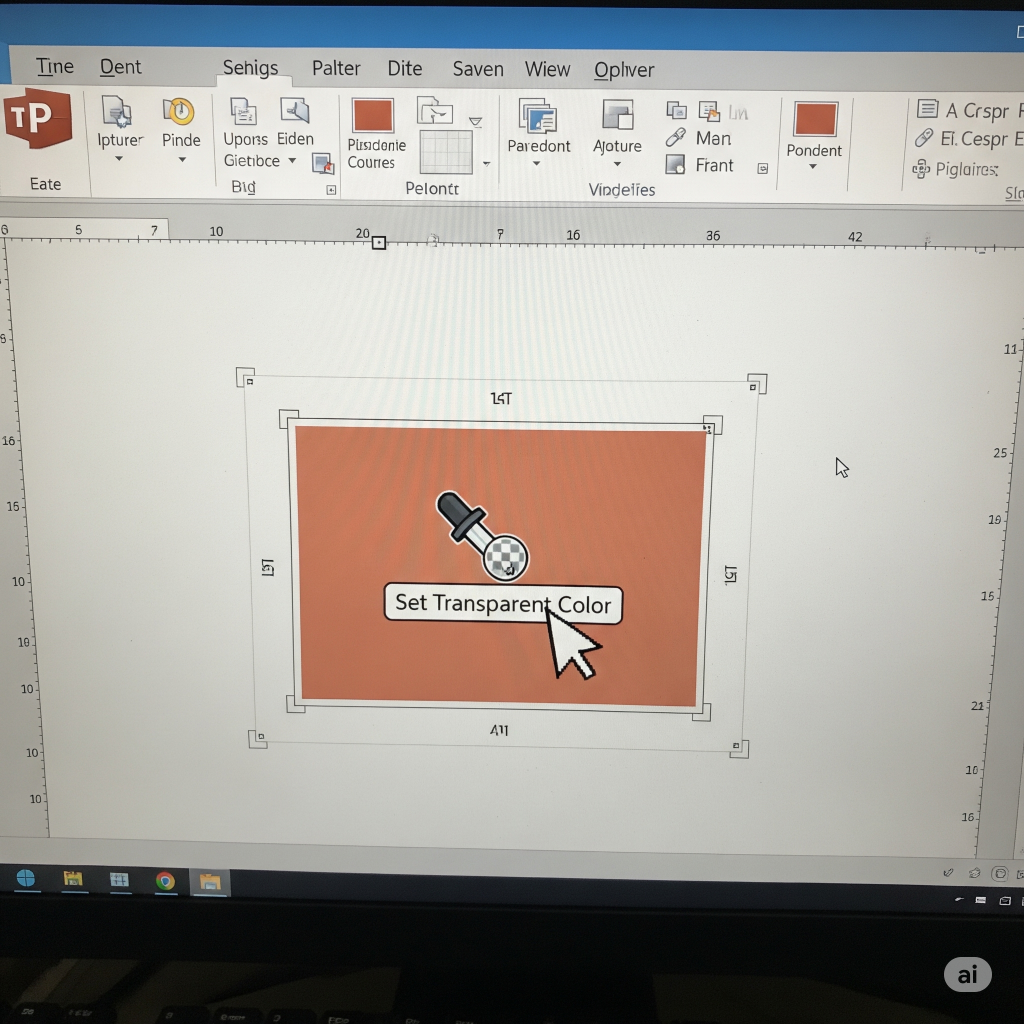
Voilà! PowerPoint will instantly make all instances of that color in your image transparent. This works incredibly well for logos with clear backgrounds or simple graphics. If your background has gradients or many shades, this method might not be perfect, and you’ll want Method B.
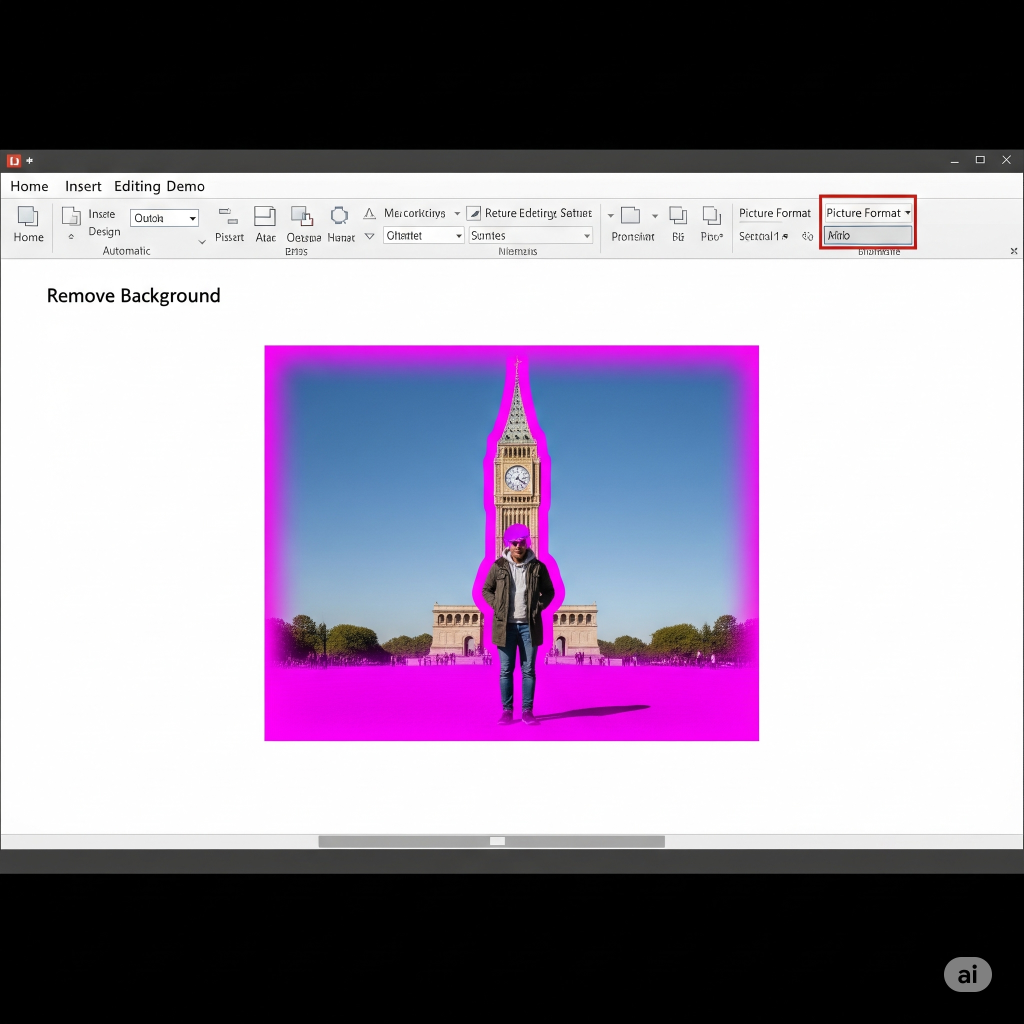
Method B: “Remove Background” (Best for Complex Backgrounds)
This is PowerPoint’s more advanced, almost magic-like tool for cutting out subjects from more complex photos, even those with varied backgrounds.
Select Your Picture:Click on the image you want to edit. The “Picture Format” tab will appear.
Click “Remove Background”: On the “Picture Format” tab, usually on the far left, you’ll find the “Remove Background” button. Click it.
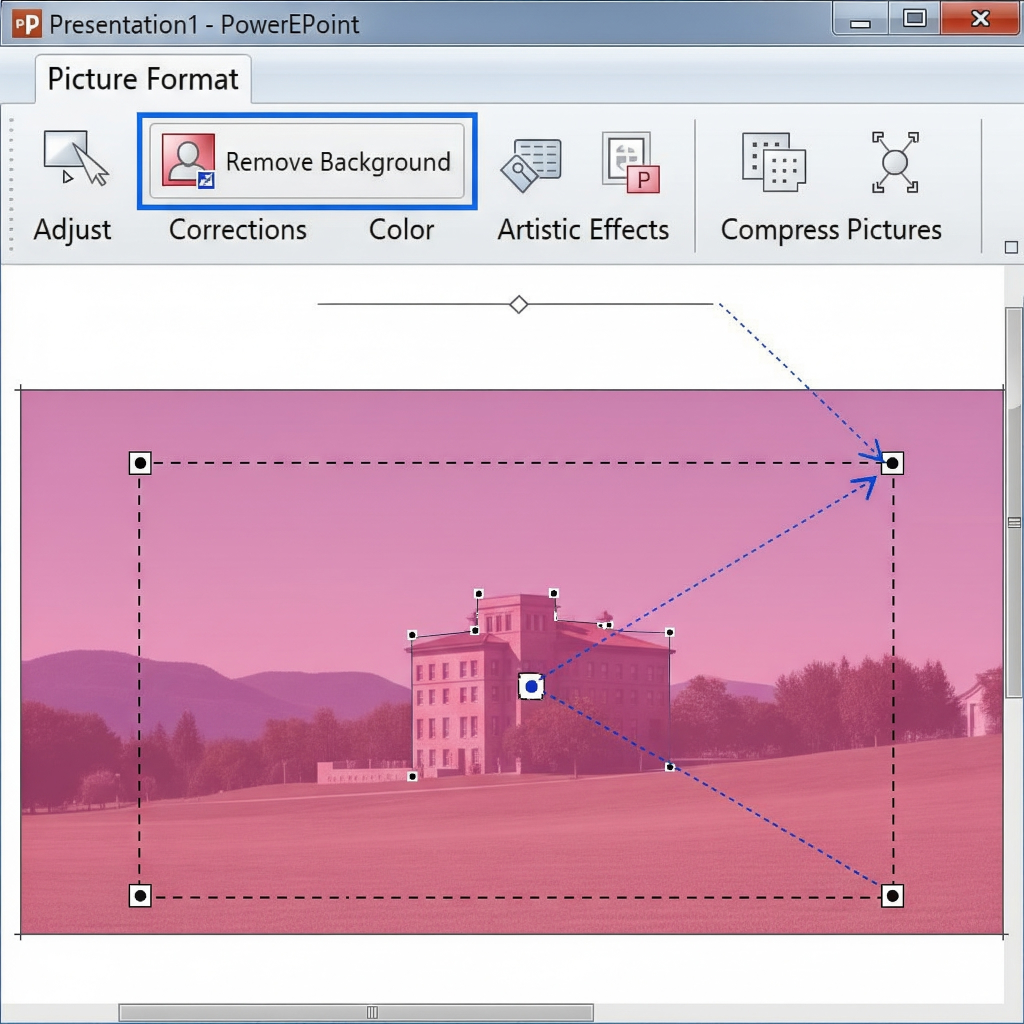
PowerPoint’s Initial Guess: Your image will transform. Areas that PowerPoint thinks are the background will be highlighted in magenta (or purple). The non-highlighted areas are what it intends to keep.
Refine Your Selection (Crucial!): PowerPoint often doesn’t get it perfectly right on the first try. Use the tools in the “Background Removal” tab that appears:
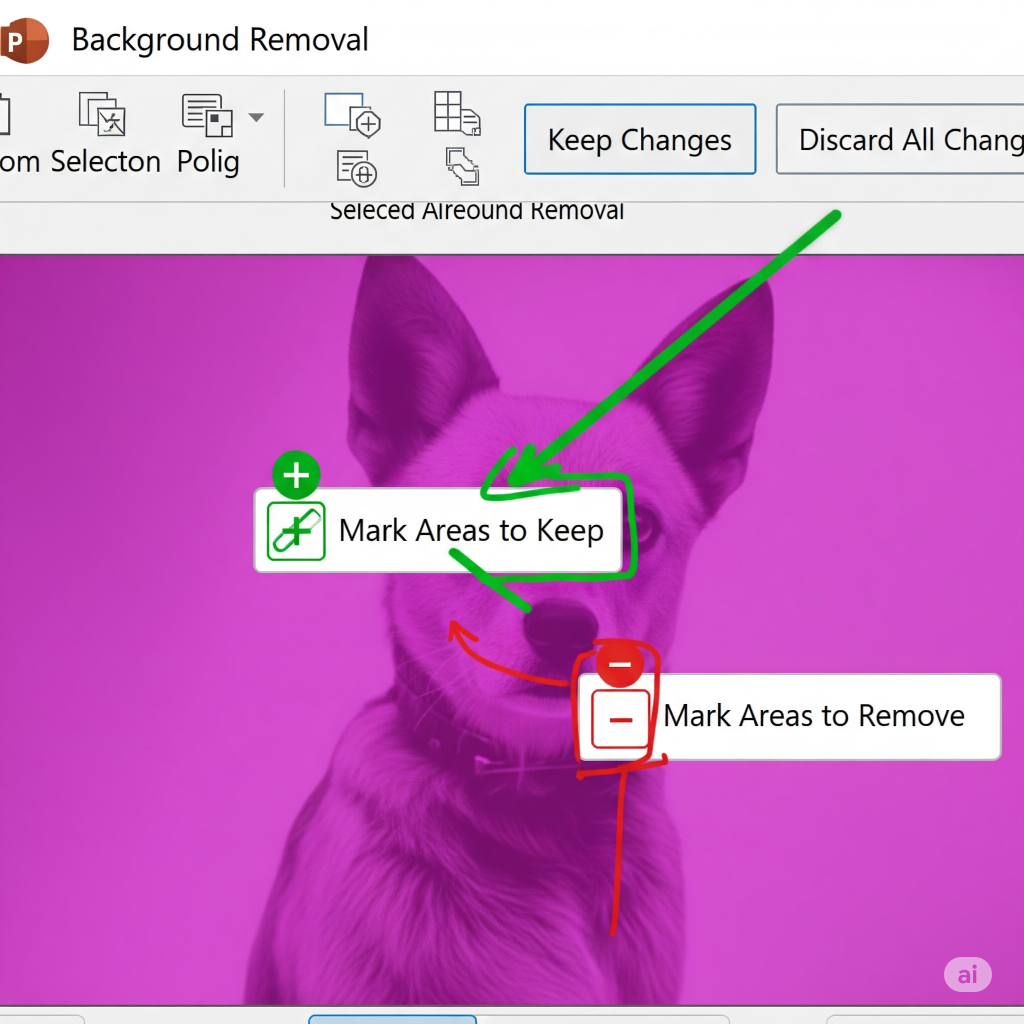
“Mark Areas to Keep”: Click this, and your cursor becomes a pen. Draw lines over areas you want to keep that PowerPoint might have mistakenly marked for removal.
“Mark Areas to Remove”: Click this to draw lines over areas you want to remove that PowerPoint mistakenly kept.
Additionally, if you simply click a region, you can “Mark for Removal” or “Discard All Changes” to start over.
Keep drawing tiny lines until only the background you wish to remove is accurately reflected in the magenta area.
Click “Preserve Changes” (usually located on the far right of the ribbon) once you are happy with your selection.
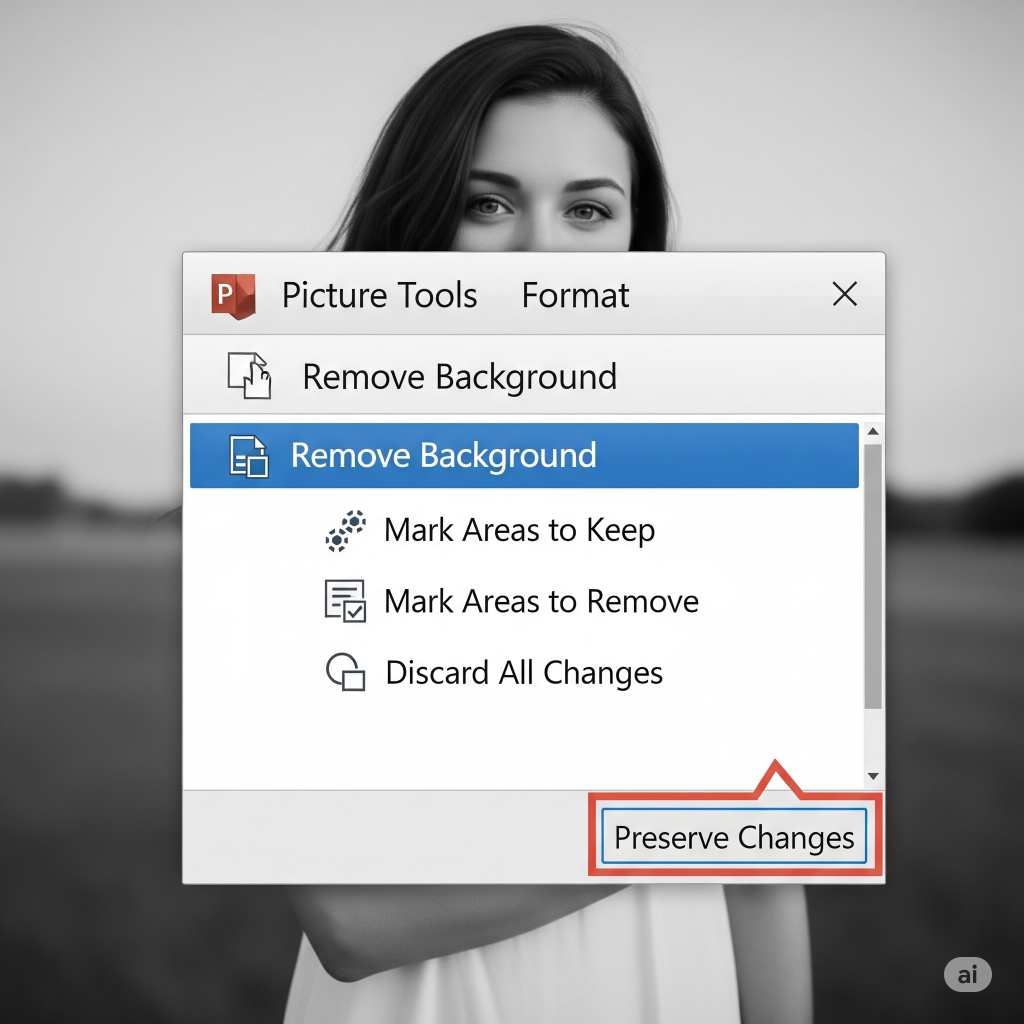
Your image’s background can now be seen through to the background or content of your slide because it is transparent! For flawless, high-quality image cutouts and a polished final look, let our design professionals handle the details at creativeone.cloud. Despite the fact that this tool is excellent for taking pictures, keep in mind that the better the contrast between your subject and background, the better the image will be.
Scenario 2: Adding watermarks and overlays by making an entire image or shape semi-transparent
Rather than deleting the background, you may want to add a subtle overlay or watermark effect that makes a shape or the entire image translucent.
Decide on the Image or Shape:Click an object to make it transparent.
Access Formatting Pane:
For a picture, select it, go to the “Picture Format” tab, and click “Transparency.” The options are pre-selected (e.g., 15%, 30%, etc.), or you can choose “Picture Transparency Options…” at the bottom.
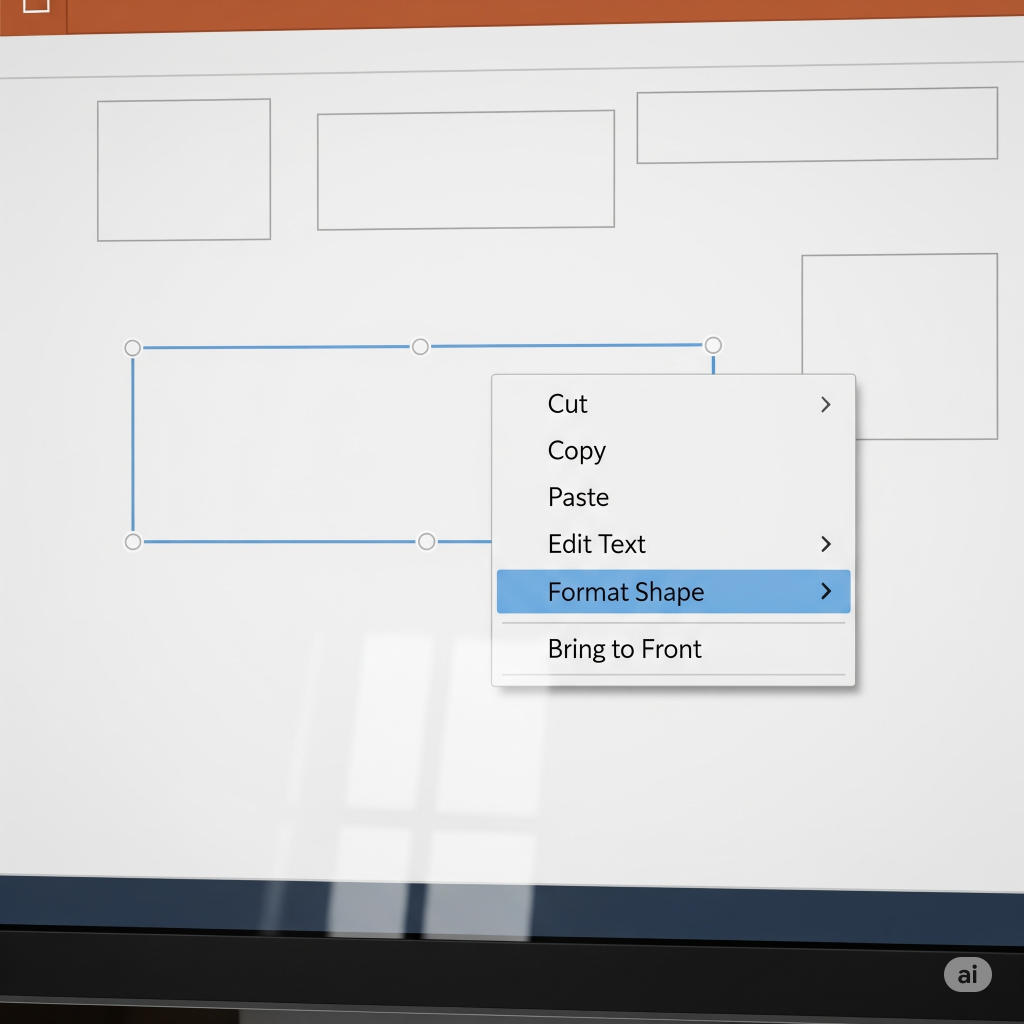
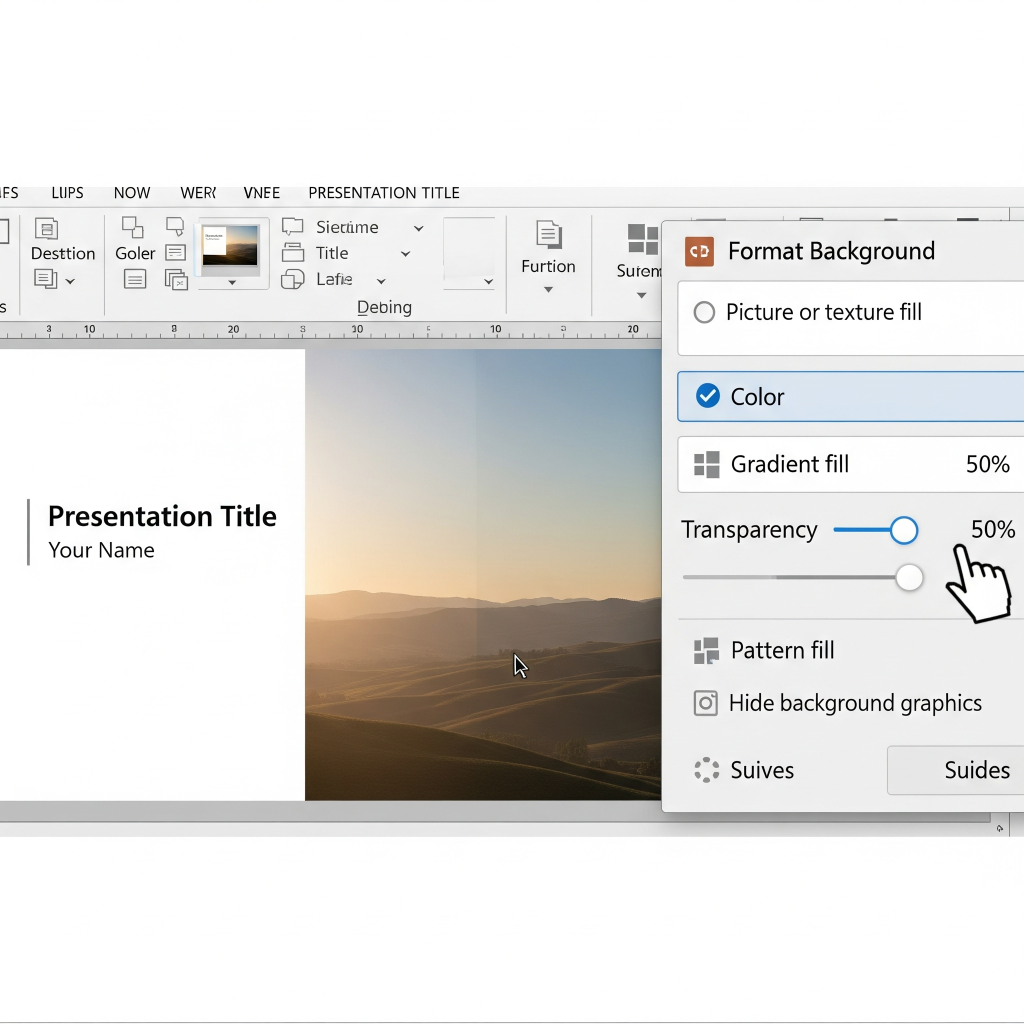
The pane can be opened by either right-clicking on a shape and choosing “Format Shape…” or by clicking the tiny arrow in the bottom right corner of the “Shape Styles” group on the “Shape Format” tab. You can make changes to the Transparency Slider:Navigating to the “Format Picture” or “Format Shape” pane on the right side of your screen will reveal the “Transparency” slider. This symbol typically shows up under the “Fill” section for shapes or the “Picture Transparency” section for images.

Drag the slider to the right to increase transparency. While 0% is completely opaque, 100% is completely invisible. Your slide will display the change in real time.
This is a fantastic method to add a subtle brand logo to the corner, create cool layered effects, or fade a background image to make text easier to read. Need a custom-designed watermark or a complete branded template? Our team at creativeone.cloud can help you build a cohesive visual identity.
Scenario 3: Adding a transparent background image to a slide to make its background “transparent.”
Unlike a web browser with a transparent PNG, PowerPoint does not allow you to make the entire slide background transparent so that the application window behind it is visible. Conversely, you can choose a background image and then make your slide transparent.
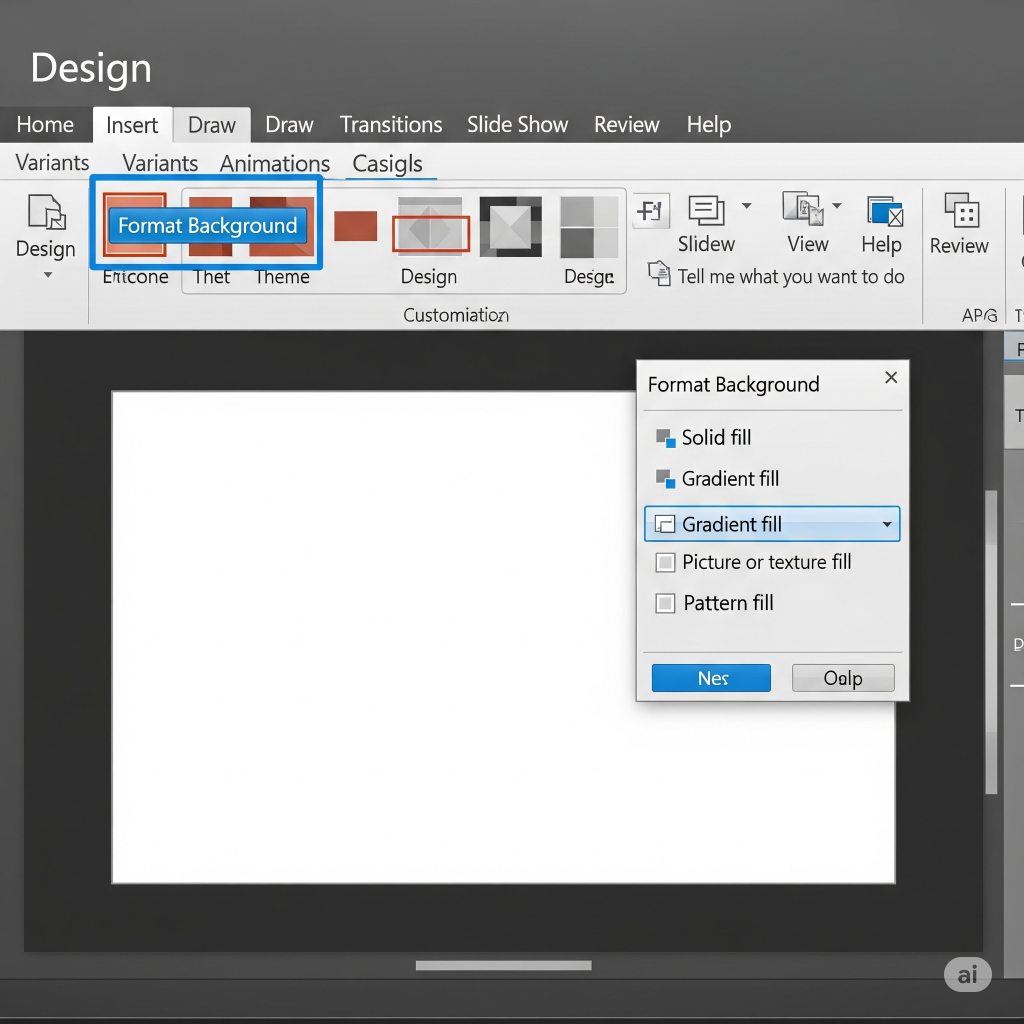
Select the ribbon’s “Design” tab.
Click “Format Background”: usually on the far right. This opens the “Format Background” pane.
Choose “Picture or Texture Fill”:In the pane, select this option.
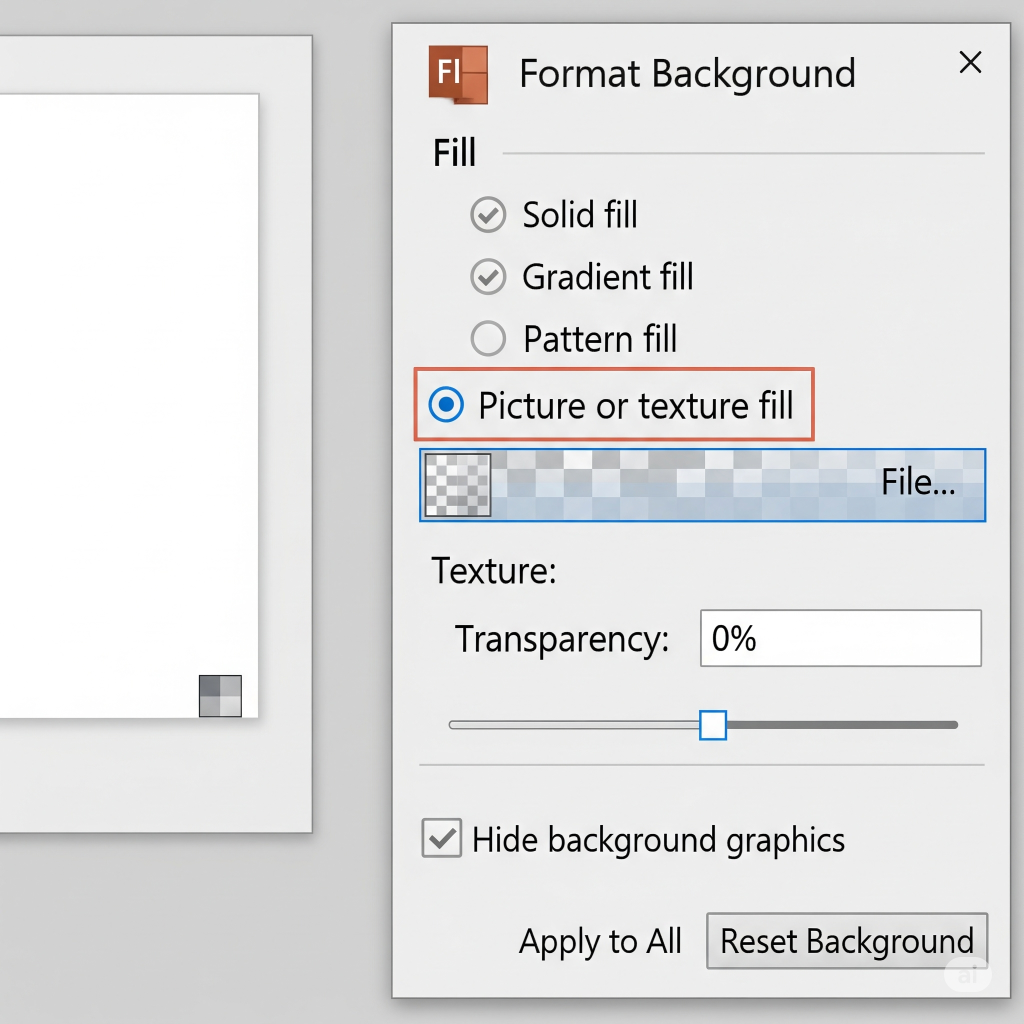
Click the “Insert…” button under “Picture Source” to add your background image. To choose the picture you wish to use as your background (or stock images, online pictures, etc.), click “From a File.”
Change the Transparency: The “Format Background” pane will display a “Transparency” slider once the image fills the background. You can adjust your background image’s transparency by dragging this slider to expose any underlying colors or even subtle themes.
No need:To ensure that this transparent background image appears on every slide you create, click the “Apply to All” button located at the bottom of the pane.
This is a great method to give each slide a branded element or a delicate visual texture without overpowering your primary content.
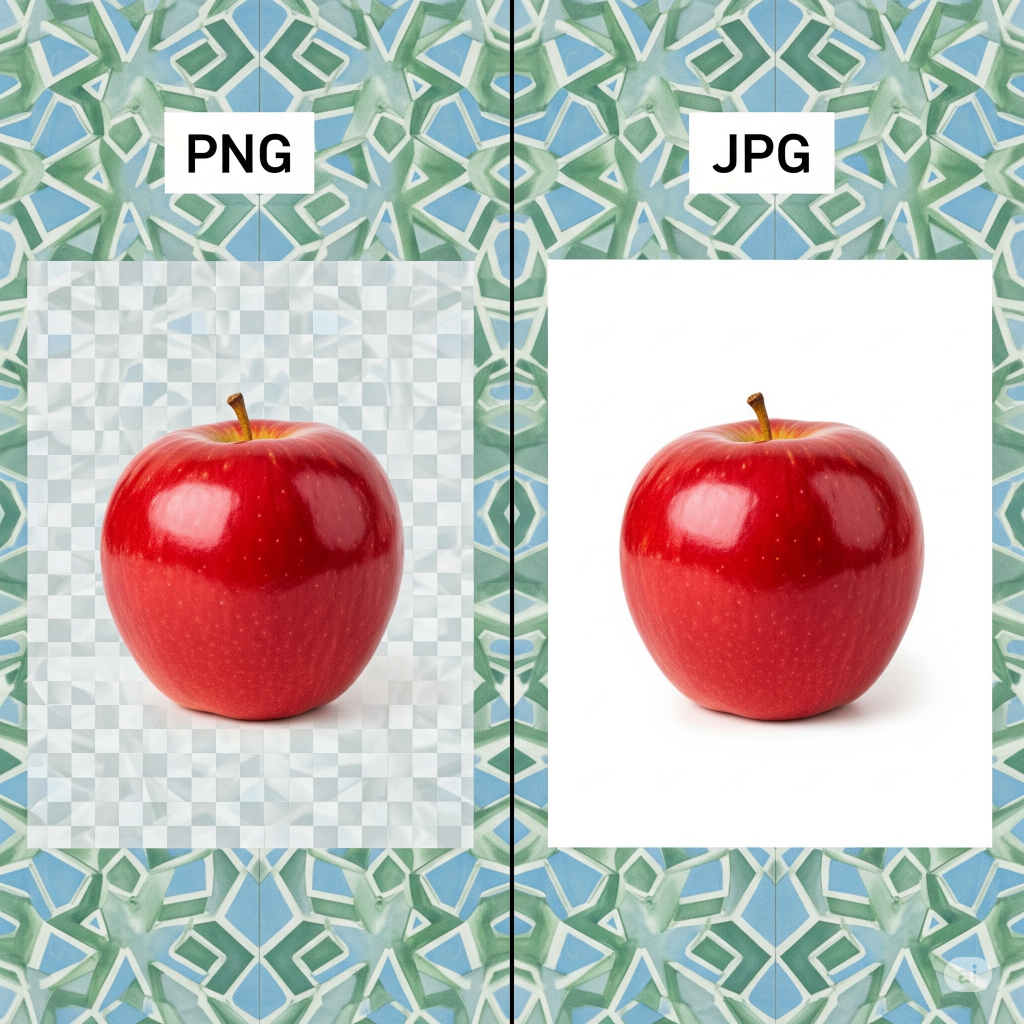
PNG is Your Transparent Friend: A Concluding Remark
Always save your photos as a PNG (.png) file if transparency is important to you, especially after you’ve used “Remove Background.” While JPG (.jpg or or.jpeg) formats usually replace any transparent areas with white, the PNG format is made to maintain transparency.
You can create presentations that are much neater, more polished, and more aesthetically pleasing by being aware of these transparency techniques in PowerPoint. Ready to take your presentations to the next level? Visit creativeone.cloud to explore our full range of professional design services.“
